In the process of building and developing a brand on Facebook, there will be times when you need to change the Page name to better suit your orientation, business goals, or new marketing strategy. A Page name is not just a line of text displayed on the profile; it is the “face” representing the business, directly affecting brand recognition, trust, and the ability to attract target customers. However, in reality, many Page administrators face difficulties when trying to rename a Facebook page due to repeated rejection and a lack of approval from Facebook. If you are also in this situation and don’t know how to change your name successfully, let Optimal Agency guide you through the detailed instructions in the article below. We will help you understand the process, important notes, and tips to avoid errors when renaming your Page.
Before going into the details of the steps to change the name of your Facebook fanpage, I want to emphasize that you should choose a good name because it has a great impact on your business advertising. When you run Facebook ads for your fanpage, customers will look at your page name to know what field your business is trying to promote. Therefore, to have a suitable Fanpage name, you need to have a formula of business name + the service you are trying to promote.
How to rename Facebook fanpage successfully 100%
Changing a Facebook Page name sometimes becomes a critical need, especially when a business or individual wants to adjust their business strategy, rebrand, or simply optimize the Page name to be more easily searchable. If you are struggling to know where to start, follow the steps below, which we have practiced and successfully verified.
Important note after renaming
Before renaming your Fanpage, carefully read Facebook’s announcement:
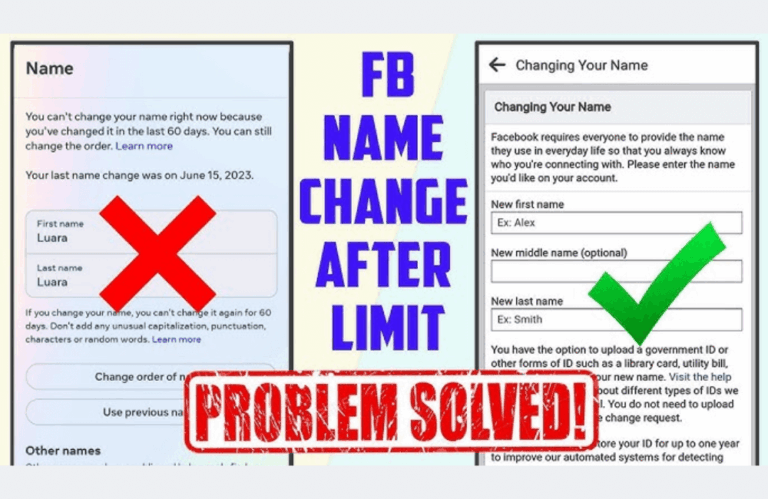
- After changing the name, you will not be able to change it again for 60 days (approximately 2 months).
- Make sure the new name suits your business objectives, is easy to remember, and accurately reflects the brand you are building.
Example: If you are operating an online cosmetic store, instead of using the name “Shop ABC,” you can change it to “ABC Official Cosmetics – Beautiful & Safe” to increase your ability to attract customers.
Step 1: Access your Facebook account and select the Page to rename
Log in to your personal Facebook account. Then, switch to the Page you are managing. Example: In my personal account, I have many different Pages. If I want to rename the “JG Entertainment” Page, I just select this specific Page to start the process.
Step 2: Switch to Desktop site mode
If you are using a phone, tap the three-bar menu icon (menu).
- Here, select the three dots at the top and tap Desktop site.
- When you select this mode, your screen will display wider, similar to the PC interface.
- You can use two fingers to zoom in/zoom out for easier operation.
Step 3: Go to Settings & privacy
After the interface switches to Desktop mode, tap the profile picture icon in the corner of the screen.
- Next, select Settings & Privacy → Settings.
Note: You need to ensure you are operating on the Page, not your personal account. If you are unsure, tap the profile picture again, then select See all Pages. Here, Facebook will display a list of all the Pages you manage.
Example: I select the “JG Entertainment” Page to rename. After tapping, the system will automatically switch to the management interface for this Page.
Step 4: Find the Page Setup section
Once in the Page interface, tap the profile picture once again → select Settings & Privacy → Settings.
- Then, zoom in on the screen and find the Page Setup section.
- Here, you will see a window displaying basic information, including the Page Name.
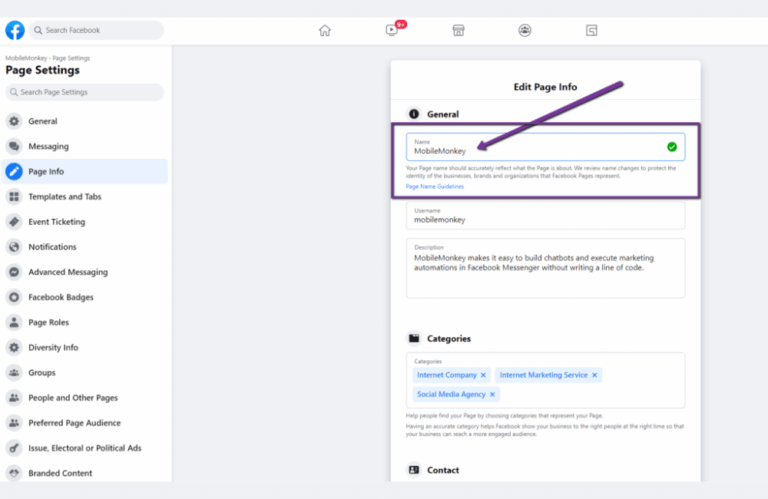
Step 5: Proceed to rename the Facebook Page
- Click on View in the section showing the Page name.
- When the window opens, you will see the Page Name along with the Edit option.
- Click Edit, enter your desired new name.
- Then select Review Changes → Save.
At this point, you have successfully renamed your Facebook Page.
Tips to rename a Facebook Fanpage without waiting 60 days
To rename a Facebook Fanpage, users typically have to comply with the 60-day waiting rule before performing the next operation. However, this can sometimes cause a lot of inconvenience, especially when a business needs to change the name to align with a new business strategy, brand positioning, or to attract customers more effectively. The good news is that there are still ways to help you rename your Fanpage without having to wait the full 60 days. In this section, Optimal Agency will share detailed, safe, and easy-to-implement methods that you can apply immediately.
Step 1: Add a renaming utility to your browser
We recommend that you go to the Extension Manager on Chrome and turn on Developer Mode. Then, extract the utility folder you previously downloaded.
Simply left-click and drag the utility folder into the extension manager window; the system will automatically add the Page Name Change Request utility. When the process is complete, this utility will appear in the top right corner of your browser.
Step 2: Link the Fanpage to the utility
Next, revisit the Fanpage you want to rename on Facebook. Copy the URL displayed in the address bar and paste it into the utility’s request section.
Then, fill in the complete information for the old and new names of the Fanpage. Note that the new name must comply with Facebook’s rules, not contain forbidden characters, or violate content.
Step 3: Write an explanation to increase approval likelihood
An important tip we often use for clients is to write a clear explanation to help Facebook understand the reason for the name change. For example, you can write:
“Dear Facebook Support Team,
I am the administrator of this Page. I am writing to report an issue regarding the 60-day waiting period to rename the Page. The new name accurately reflects the content and purpose of the Page’s activity following our rebranding.
I look forward to support from Facebook to resolve this issue. Thank you!”
When you provide a reasonable explanation, the likelihood of Facebook approval is much higher.
Step 4: Take a screenshot for proof
To complete the request, you need to take a screenshot of a post previously published on the Page and upload the image as evidence. The method is very simple:
- If you use Windows, just open Snipping Tool or Snip & Sketch to capture the screen.
- With a MacBook, use the keyboard shortcut Command + Shift + 4.
This screenshot helps Facebook verify that you are indeed the administrator and are legitimately managing the Page.
Step 5: Submit the request and receive results via email
After completing the steps above, enter your email address to receive notifications from Facebook. Click Submit, and the system will confirm that your request has been sent.
Typically, within a few hours to a few days, you will receive an email response. For example, in one test, we received an email from Facebook confirming that the Fanpage had been successfully changed from “Rapid Disasters” to “Emma Watson.” This is clear evidence that you can rename without having to wait the full 60 days.
Step 6: Check the Fanpage again
Return to your Fanpage to check. If the process was successful, you will see the Page name has been updated as desired. Additionally, Facebook also displays a confirmation notification right within the Page administration interface.
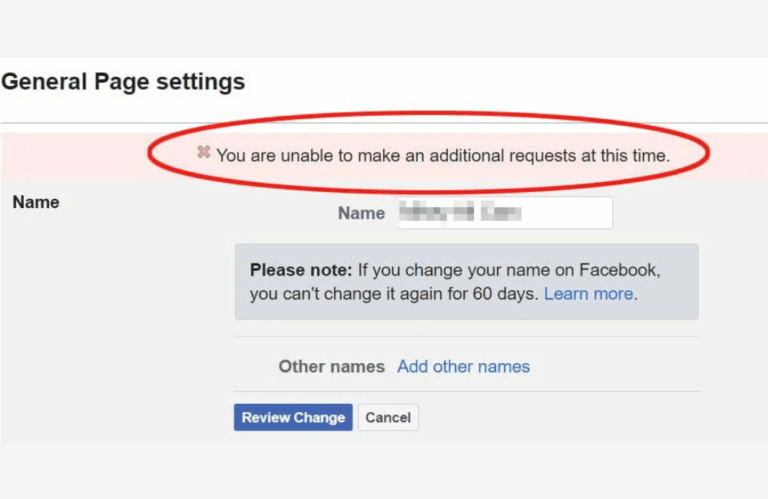
How to fix the error when you cannot rename your Facebook Page
In reality, many Page administrators encounter a confusing situation when trying to rename a Facebook page, but the system does not allow it. The reasons can stem from various factors, such as technical errors, violations of naming policies, or because Facebook is currently under review. However, instead of worrying, you can completely resolve this issue with a few simple steps right within the Facebook app.
Open the Facebook App
The first thing you need to do when you encounter the error of not being able to rename your Facebook page is to open the Facebook app on your phone. Although Facebook also supports this on a computer, based on our experience, resolving it on the app is simpler, more intuitive, and less prone to glitches.
Example: on an iPhone, you will see the Menu icon in the bottom right corner of the screen, and on Android, it is in the top right corner. Just tap it, and you will be taken to the main settings page of the application.
Access the Help & Report a problem section
After opening the menu, scroll down to the bottom of the list to find the Help and Support section. Here, we recommend you select Report a Problem. The application will display a new window; you continue to select Report a Problem once more to confirm.
Select the Pages category to submit the report
Once in the reporting interface, scroll down slightly until you see the Pages section. This is where you can submit information directly related to the Page renaming issue.
At this step, we usually enter the report content as follows: “I am having an issue and cannot change the name of my Facebook Page. I need this issue to be resolved.”
If you prefer, you can also write it in English for easier processing by Facebook. Writing concisely, clearly, and directly to the issue will help Facebook’s support system quickly identify the error you are experiencing.
Submit the report and await processing
After completion, you just need to click the Send button in the top right corner of the screen. This is the confirmation step for Facebook to receive your report.
An important point that advertisers and Page administrators need to note is: Facebook usually does not reply directly to you via message or email. Instead, this report is recorded as a “support ticket” and will be automatically closed by the system after processing.
Based on our experience, the time Facebook takes to review this issue is usually about 24 to 48 business hours. Therefore, you should patiently wait 1 to 2 days, then return to the Page administration section to try renaming again. In most cases, the issue will be resolved, and you can successfully change the name.
Thus, renaming a Facebook page will no longer be an obstacle if you understand the process and correctly apply the steps we have shared. With an appropriate Page name, you will easily build your brand image, attract target customers, and develop your community more effectively. Try applying these tips today to ensure your Page is always professional and consistent with your business strategy.
Frequently Asked Questions
Currently, Facebook does not limit the number of times you can rename a Fanpage. However, if you change the Page name too frequently within a short period, Facebook will lock your Page renaming function. Therefore, when renaming, you need to consider carefully and choose the most suitable Fanpage name and avoid continuous changes.
Typically, Facebook only allows a Fanpage name to be changed once every 7 days in cases where you change it multiple times. As for a Fanpage you are creating for the first time, the naming is approved very quickly by Facebook, often within just a few seconds.
Typically, the time to edit a Page name lasts a maximum of 3 – 7 days. After the Fanpage is successfully renamed, people who like the Page will receive a notification about this activity.
There are many reasons why you might not be able to successfully rename your Facebook Fanpage, including:
Your Fanpage was already renamed by you or other administrators during the Facebook review period.
Or your Fanpage has violated Facebook’s policies.
The way the Facebook Fanpage name is set is not accurate, and the Fanpage name is too long or contains special characters. Or you are not eligible on the Page to perform the renaming request.
According to Facebook’s policy, only the administrator has sufficient permission to change the Page name. Additionally, if you were recently granted administrator rights, you must wait at least 6 days before you can rename the Page.
Your Page has been restricted from changing its name.