To start effective promotion on the Meta platform, you need to understand how to access and set up your Facebook Ads Manager account. This is where you control your entire campaign, from budget and audience to ad performance. Mastering every operation within the Facebook Ads Manager account will help you avoid system errors, improve security, and optimize every dollar of ad spend. The guide below will lead you through detailed steps from logging in, setting up billing, to configuring access permissions so you can confidently manage your campaigns professionally and safely.
Getting started with Facebook ads manager

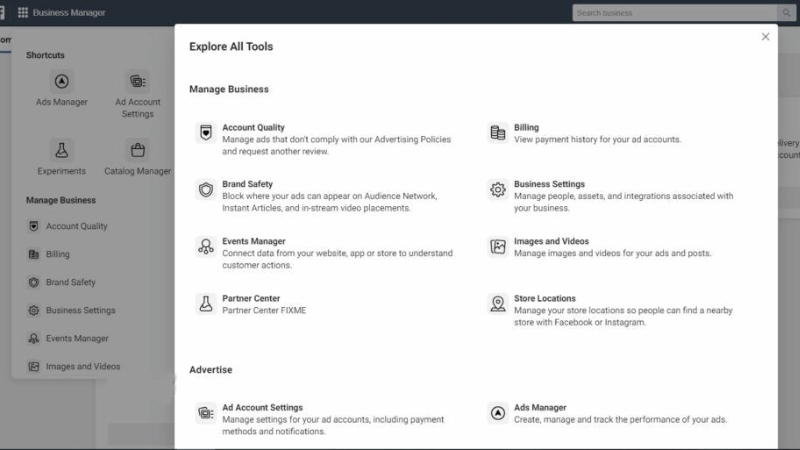
The Facebook Ads Manager is the central tool that helps marketers control their entire campaigns on the Meta platform. From setting up budgets and tracking performance to analyzing data, all operations take place in a single management space. When starting, the most important thing is to understand how to access and set up the basic information. These steps not only help the account operate stably but also limit technical errors during ad delivery.
How to log in correctly and quickly
On a computer, you can go directly to the link: facebook.com/adsmanager/manage/; when the page opens, log in to your personal Facebook account. This is the fastest way to go straight to the ad management section without navigating through multiple steps. Alternatively, you can also access it from the Facebook homepage. Find the “See All” option in the left menu bar, then scroll down to the “Professional” section and select “Ads Manager.”
On a phone, Meta supports the Meta Ads Manager app available for both iOS and Android. After downloading, open the app and log in with the Facebook account you want to use to run ads. The phone interface is optimized for quick monitoring and adjustments, which is very suitable when you are away from your computer.
Setting up billing information and account access
After logging in, the next step is to set up the payment method. You can choose a credit card, debit card, or PayPal, depending on the supported region. Ensure that the billing information matches the account holder to avoid automatic locks. Additionally, you should set a daily spending limit to control the budget better.
You can add administrators, employees, or partners to the account by entering their email address or user ID. Only grant permissions corresponding to their role—for example, employees should only be allowed to create ads, not edit payment methods. Tight access management helps reduce the risk of losing control or leaking campaign data.
Adjusting the interface for easier campaign tracking
A small tip for faster operation is to customize the display interface. In the settings section, you can rearrange data columns such as cost, impressions, click-through rate (CTR), or conversion results. This helps you monitor important metrics right on the main screen without having to open detailed reports.
In addition, you can save different display layouts for each campaign group. For example, one layout focuses on conversion ad performance, while another tracks brand awareness ads. When working in a team, standardizing the data display also helps the entire team easily discuss and analyze results.
Getting familiar with the Facebook Ads Manager is not difficult; the key is to dedicate time to setting it up correctly from the start. When all billing information, access permissions, and the interface are optimized, the entire ad operation process will be smoother, more precise, and save more time.
Setting up an ad account for beginners
To run any campaign, the first thing you need is to create and properly configure an ad account. When you understand each setup step clearly, you will easily control spending, track effectiveness, and avoid risks when managing multiple campaigns simultaneously.
Creating a personal ad account
If you already have a Facebook account, you automatically have a default personal ad account. You just need to log in to the Ads Manager to start creating campaigns, setting budgets, and monitoring results.
With this type of account, you can test small, individual ads, which is suitable for individuals or those new to advertising. All basic tools are available; the only difference is that the scope of use is more limited than a Business Manager account.
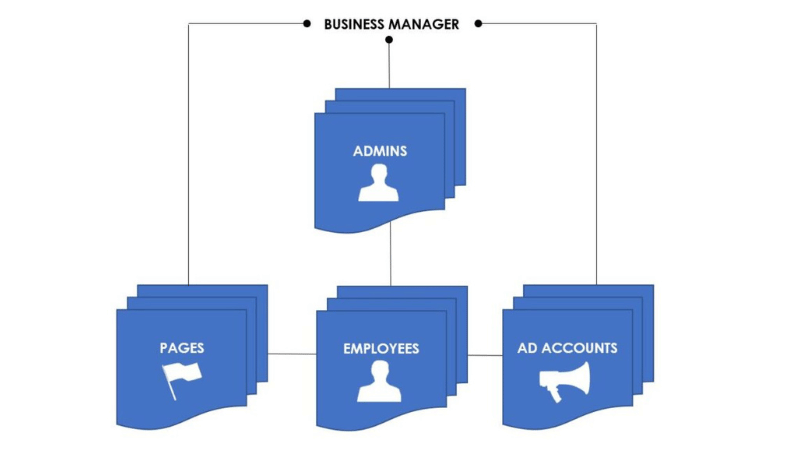
Setting up a Business Manager ad account
When you work in a team or want to manage multiple pages simultaneously, switch to using Business Manager. Start by visiting the business.facebook.com/create page to create a Business Manager. Fill in complete business information and the email you are using to initiate the new account. Once complete, go to Business Settings to customize the management items.
Next, select the Accounts section, then go to Ad Accounts. Click Add and choose Create a new Ad Account. The system will prompt you to fill in basic information such as the account name, time zone, and currency. After entering, click Next to save. Then, select the business profile you want to link and click Create to complete this step.
Finally, add users and set up the payment method. This is a crucial step to ensure the ad can run stably and the payment data is saved accurately. You can assign different roles to each person in the team, making permission management clearer.
Maintaining and optimizing the ad account for the long term
A well-managed account will help you control the budget, avoid errors, and accurately track campaign data. Long-term management planning will help you save time and reduce risks when executing multiple campaigns simultaneously.
Spending limits and billing schedule
First, you need to check the monthly spending limit for each account. Facebook provides a tool that displays the amount spent and the remaining limit. The billing schedule needs to be set accurately to avoid campaign interruption.
Regularly checking the billing report will help you identify unusual charges in time. You can set up alerts to receive notifications when you are close to the spending limit. This is an important step to maintain a stable budget and optimize ad performance.
Managing member roles in the business
Access management helps protect the account from security risks. Each member should have a role appropriate to their task. You can assign permissions to view, edit, or manage billing, depending on the level of responsibility.
Periodically reviewing access permissions helps detect unnecessary permissions and limits risks from former users. When there are personnel changes, immediately updating the roles will keep the account secure and prevent errors during campaign operation.
Note and save the account configuration for easy restoration
Detailed notes on the account configuration, including billing information, access permissions, pixels, and page links, will help you restore it quickly when needed. Careful data storage helps reduce the time spent searching and troubleshooting when issues occur.
You should create configuration backups periodically to ensure all important information is always protected. This operation is particularly useful when running multiple campaigns simultaneously or when the account encounters unexpected problems.
Maintaining your Facebook Ads Manager account methodically will help campaigns run smoothly, improve security, and optimize costs. Paying attention to tracking spending, managing access permissions, and taking complete notes will help you control all activities without interruption. Long-term management is the key factor for the account to remain stable and effective.
Frequently Asked Questions
First, you need to accurately determine the cause of the violation based on the notification from Facebook. Then, prepare complete documentation or a detailed explanation of the campaign and the modifications you have made. Submit a review request through the Help Center, and simultaneously review all other campaigns to ensure there are no remaining violations. Storing the previous configuration and notes will help the explanation process proceed faster and more effectively.
How can I grant permissions to multiple members in the business while ensuring data security?
You need to assign roles based on the principle of least privilege, meaning each member is only granted permissions appropriate to their task. Clearly use the roles of administrator, editor, and analyst. Periodically review access permissions and remove people no longer involved in the project. Combining two-factor authentication and monitoring the activity history of each member will ensure effective data security.