Many Facebook Ads campaigns encounter issues right from the initialization phase, even when content and budgets are meticulously prepared. The cause often lies not in the strategy, but in how the ad account is created on the Facebook Page. Therefore, how to create ad account on Facebook Page serves as the foundation for the entire subsequent advertising system, directly affecting stability, scalability, and policy compliance in 2026. From personal account requirements and Page status to setup operations within Business Manager, every step requires precision and consistency. Let Optimal explore how to create ad account on a Facebook Page guide through a clear roadmap, focusing on sustainability and practical operation rather than just basic procedures.
Ad accounts determine campaign longevity
A standard-compliant account setup ensures stable ad operations, even distribution, and fewer manual reviews. Conversely, a single misaligned link can cause the entire campaign to suffer from throttled delivery or abrupt stops, even if the content does not violate any policies.

Mandatory requirements from the Facebook Page
A Facebook Page is not merely a place to display ads; it is a signal for evaluating the credibility of the entire ad account. Meta relies heavily on the Page’s activity history to determine safety levels for ad delivery.
A Page with complete information, stable posting history, and no signs of erratic “on-off” behavior is typically rated higher by the system than newly created pages with almost no organic activity.
Beyond public-facing elements, “backstage” factors, such as name change history, business category shifts, and description edits, are also recorded by Meta. Pages that have undergone excessive changes in a short period are often categorized as high-monitor, thereby dragging down the stability of the associated ad account.
Personal accounts and administrative rights
Personal accounts play a core role in “guaranteeing” the ad account. Meta does not evaluate administrative rights equally; it distinguishes clearly between the creator, the manager, and those with only advertiser-level permissions. A personal account with a clean history, stable behavior, and no prior warnings helps the ad account maintain a long-term safe status.
In contrast, assigning administrative rights to too many personal accounts, especially new accounts or those with inconsistent access behaviors, easily triggers system detection for unusual risks. In practice, many Facebook ad accounts are restricted not due to ad content, but rather due to administrative disruptions behind the scenes.
Is Business Manager necessary?
A Business Manager is not always mandatory, but for long-term-oriented campaigns, it is a structural layer that helps Meta classify and manage risks more easily. When the ad account, Facebook Page, and payment methods are placed within the same clear Business Manager, the system evaluates the relationship between these components as more consistent and logical.
Not using Business Manager in the early stages might allow for faster setup, but in the long run, it limits scalability, permission management, and control over advertising assets. Especially for campaigns requiring large budgets or operating multiple Pages simultaneously, Business Manager becomes the foundation to avoid overlapping permissions and reduce the risk of unintended censorship tightening.
How to create ad account on Facebook Page: A – Z Guide
The process of creating an ad account on a Facebook Page is not just a technical task, but a series of settings that directly impact future control, scalability, and account stability. All operations should be performed within Business Settings, where Meta centralizes all business configurations and advertising assets.
Step 1: Access Business settings
From Business Manager, click on Business Settings; the system will load all existing business configurations. Here, Meta allows the creation, editing, and management of all configurations related to ad assets. Business Settings acts as a coordination hub where all changes to access rights, accounts, pages, and partners are recorded and tracked.
Step 2: Set up user permissions and control scope
In Business Settings, you can add admins, operational personnel, or partners by assigning rights at each level. Meta allows you to set active or inactive statuses and limit or expand control for each asset.
These permissions affect not only operational capability but also the credibility of the Business Manager. Besides regular users, the system supports partners and system users, typically used for agencies or specialized advertising infrastructure.
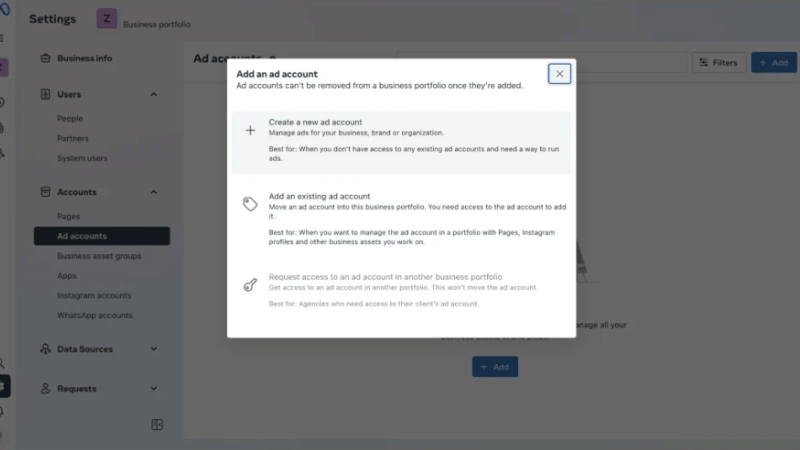
Step 3: Add an ad account from the Accounts section
Click on Add account to begin working with the ad account. Meta displays various asset types such as Pages, Apps, Instagram Accounts, or WhatsApp Accounts; however, for the current goal, select Add ad account. Here, the system provides two directions:

- Create a new ad account.
- Request access to an ad account from another Business Manager.
This choice determines whether you have full ownership or merely operate a shared account.
Step 4: Create a new ad account in Business Manager
To create a new one, click Create new ad account. The system requires you to name the account, then fill in foundational information such as time zone and currency. These are fixed settings that directly affect reporting, spending, and data synchronization, so they must be selected accurately from the start. Once completed, click Next to identify the entity using the account.
Meta requires identifying which business this ad account serves. If the account is for another business or client, select Another business and enter the corresponding Business ID.
If created for the current business, the system will link directly to the operating Business Manager. Assigning the correct Business ID places the account in the correct management flow and limits the risk of ownership disputes.
Step 5: Assign permissions for the ad account
Once created, the ad account cannot operate immediately until permissions are granted. In this step, you must select the appropriate user or entity, set the corresponding permissions, and then click Assign.
The permissions granted here determine who can create campaigns, edit payments, or manage related assets. Clear permissioning from the start avoids internal conflicts and access errors during ad execution.
Step 6: Set up payment methods
Add payment information by clicking Add payment information. The system will display business data for confirmation, then allow you to choose a suitable payment method. Depending on the region and usage goal, you can choose prepaid or postpaid formats. Even if this step is skipped, the account will default to a prepaid status.
Step 7: Connect the ad account to the Facebook Page
In the Pages section, add a fanpage by searching by name or pasting the page URL. When the system displays the correct fanpage, select it and grant Full control to the ad account. Granting full authority allows the account to run ads, manage content, and synchronize Page data seamlessly. Click Assign to complete the connection process.
Common errors leading to early account restrictions
Ad accounts restricted in the early stages rarely stem from ad content. Most problems arise from the backend operational foundation, where Meta silently cross-references data, behavior, and the consistency of the entire account ecosystem. When one link is misaligned, the system triggers early control mechanisms instead of waiting for the ads to spend large budgets.
Errors in information verification
The verification process is not just about submitting enough documents. Meta evaluates credibility based on the logic between personal identity, business information, payment methods, and prior activity history.
An account using valid information but lacking connectivity, such as business documents for a newly created entity, while the personal account has almost no activity footprint, will still be flagged for monitoring. Reality shows that early-restricted accounts often share a commonality: they finish verification but fail to create a “trust footprint” thick enough in the system, causing Meta to prioritize tightening over opening.
Inconsistent setup between Page and account
Facebook Pages and ad accounts are always viewed by Meta as a pair. When the information displayed on the Page is out of sync with the ad account structure, the system views it as a potential risk signal.
This is evident in cases where a Page tells one brand story, while the ad account takes on a completely different appearance in terms of business category, operating country, or edit history. Meta’s internal data prioritizes continuity, so even a single mismatch puts the account into a controlled state before ads can stabilize.
Signals triggering high-risk assessments by Meta
Meta does not wait for an obvious violation to take action. Signals such as rapid administrative operations, changing important settings in a short time, or behavioral patterns unlike a typical user are recorded from day one.
Accounts that face early restrictions often show signs of being misread, meaning behavior indicates commercial goals are too clear, while the account foundation lacks corresponding credibility. When the risk exceeds the allowable threshold, the system automatically lowers distribution or restricts advertising rights to minimize the possibility of future violations.
Frequently Asked Questions
The number is not fixed, but creating multiple accounts consecutively from the same Page in a short time is often seen as unusual behavior and easily triggers automated controls.
Yes. Changing the Page identity in the early stages can cause Meta to record signs of instability, thereby increasing the review frequency for the linked ad account.