When connecting Shopify to the Meta ecosystem, Shopify permission for Facebook ads is no longer a minor technical step but has become a mandatory factor for campaigns to operate stably and possess accurate data. If access rights are misconfigured or lack verification, ads may deliver poorly, fail to record conversions, or even result in account restrictions. In the context of Meta increasingly tightening data and privacy controls, Shopify’s permission for Facebook ads helps ensure that Pixels, Conversions API (CAPI), and product catalogs function correctly, synchronizing seamlessly from the store to the Ads Manager. Understanding the required permissions, access scope, and proper setup process from the start will help businesses avoid disruptions, maintain performance stability, and create a foundation for long-term scaling campaigns.
Shopify permission for Facebook ads framework 2026
For Meta’s Advantage+ algorithm to optimize performance, the system requires deep access to the store’s backend infrastructure via the new-generation Conversions API (CAPI) protocol. Correctly setting up this permission framework not only ensures the accuracy of conversion reporting but also serves as a prerequisite for businesses to comply with increasingly stringent data security regulations.
Core permission groups Shopify must grant to Meta
To smoothly operate shopping ad campaigns, merchants need to approve three main access groups within Shopify administration. These permissions allow Meta to synchronize data in real-time without relying entirely on web browsers.
- Catalog (Product) management permission: Meta needs read access to product catalogs to automatically update prices, inventory levels, and image attributes. If this permission is restricted, Dynamic Product Ads (DPA) will encounter errors displaying incorrect prices, affecting click-through rates (CTR).
- Customer and order data access: This is the most sensitive permission group, allowing Meta to receive signals from Purchase, Add to Cart, and Initiate Checkout events.
With full access configuration via CAPI, the Event Match Quality (EMQ) on Shopify can reach 8.5 – 9.5/10. Conversely, if permissions are only granted at the basic level via the browser Pixel, this rate typically drops below 4.0, resulting in an average increase of 25% to 40% in the cost per purchase due to the algorithm’s lack of machine learning data.
Scope of shared data and access limits
Despite deep access, Shopify in 2026 still provides filtering layers for merchants to control the scope of data shared with Meta. Shared data primarily focuses on hashed identification information to protect individual customer privacy according to global standards.
The typical scope of sharing includes email addresses, phone numbers (encrypted), and order values to serve ROI calculations. However, access limits are set so that Meta cannot interfere with other internal Shopify administrative processes, such as supplier lists, store owners’ bank account information, or internal staff notes.
Operational reality shows that setting the data sharing level to “Maximum” in the Facebook Channel settings on Shopify can help increase ad delivery efficiency by 15% thanks to additional server-side signals.
Changes in access permissions compared to previous years
Compared to the 2024-2025 period, the 2026 access framework has major technical turning points, particularly the gradual phasing out of third-party cookie dependence. Access now focuses heavily on first-party data and requires clearer confirmation from end-users.
Meta now requires Shopify to send customer consent signals with each data packet. If Shopify does not forward the user’s consent status, Meta will automatically anonymize or discard that data to avoid legal penalties.
In 2026, access to the Shopify Checkout page is more tightly controlled. Meta no longer has the right to read information while customers are entering credit card details, but only receives “Success” or “Failure” status notifications and the final order value.
This change enhances security but requires ad specialists to optimize customer funnels based on early behavioral signals rather than just final payment results, with target CPMs typically ranging from $12.00 – $18.00 for high-quality audience segments on Shopify.
Setting up the Facebook ads connection with Shopify
Integrating Facebook directly into the Shopify ecosystem is a strategic move that helps businesses synchronize product catalogs, manage customer data, and deploy conversion-optimized Facebook ad campaigns. This process allows Meta to directly access purchase signals from Shopify, thereby enhancing the accuracy of performance reports and improving targeting algorithms.
Desktop setup process
The desktop interface provides the most comprehensive view for managing complex business assets like Business Manager and Ad Accounts. This is the recommended method to ensure all access rights are granted accurately and fully.
- Access Shopify Administration: Log in to your Shopify admin account on a web browser.
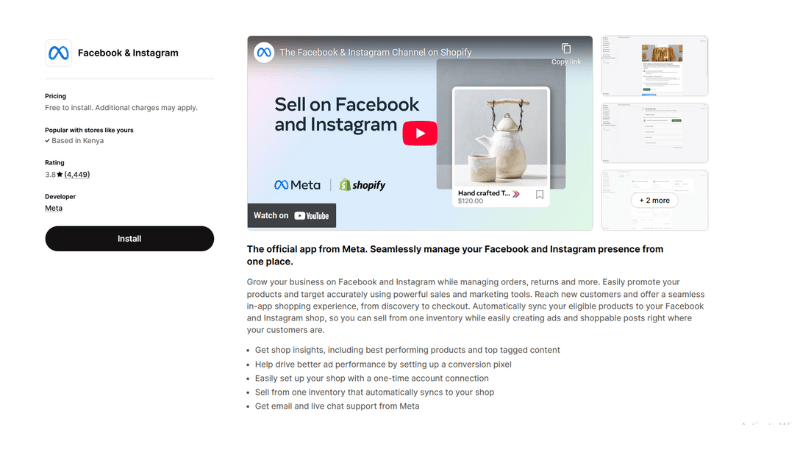
- Search for Integration App: Go to the Shopify App Store and search for the official app from Meta titled “Facebook & Instagram.”
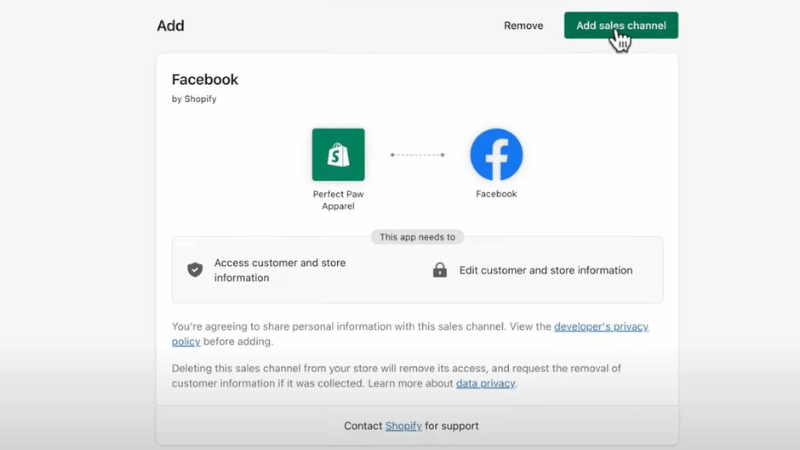
- Activate Sales Channel: Click the “Add channel” or “Add app” button, then confirm the “Connect account” selection to begin linking with Meta’s system.
- Identity Authentication: Log in to the personal Facebook account that holds the highest administrative rights over your business assets.
- Configure Assets: Select and connect the necessary assets, including: Fanpage, Business Manager, Ad Account, and Pixel/Dataset to serve the features you intend to deploy.
- Approve Policies: Carefully read and accept Meta’s terms and conditions for merchants, then click “Finish setup” to activate the bidirectional data flow.
Mobile device setup process
For business owners who need flexibility, the Shopify mobile app allows for a quick connection while still ensuring security and technical completeness. This method is particularly useful when you need to quickly activate selling features or check connection status on the go.
- Access App Menu: Open the Shopify app on your phone and tap the three-line icon (Menu) at the corner of the screen.
- Manage Sales Channels: Tap the “+” icon next to the Sales Channels section to open the directory of linked platforms.
- Select Meta Platform: From the list, find and tap “Facebook,” then confirm the “Add” command to install the channel into the mobile system.
- Initialize Configuration: Tap “Get started” on the feature you prioritize deploying, then select “Connect account.”
- Link Accounts and Assets: Proceed to log in to Facebook, perform two-factor authentication (if applicable), and designate the corresponding business assets (Pages, Ad Accounts) you want to synchronize with Shopify.
- Confirm Completion: Accept the platform’s privacy and data-sharing regulations, then tap the “Finish setup” button for the system to begin the product catalog synchronization process.
Frequently Asked Questions
The cause is usually a break in Webhook access or Meta’s limited scanning frequency. In 2026, Meta prioritizes data updates via the Real-time API. If you do not grant “Write” permission to the Facebook app on Shopify, the system will fall into periodic scan mode (usually once every 24 hours). You need to re-check the Product Feed Settings and ensure Inventory Read/Write permissions are approved for 100% real-time inventory matching.
In reality, it isn’t easy. When you install the Facebook channel on Shopify, “Read Orders” permission usually covers the entire transaction history for Meta to optimize Lookalike audiences. If you want to limit this, you must use third-party CAPI apps to filter data before sending. However, this will significantly reduce Meta’s AI machine learning efficiency, typically causing CPA to increase by 15% to 20% due to missing sample data.