Selling online on Facebook is a popular choice for many business beginners because of the low cost, easy customer access, and no need for complex technical knowledge. With just a personal Facebook account or a simple Fanpage, you can introduce products, interact with customers, and generate your first orders. However, to sell effectively, beginners need to correctly understand Facebook’s operations, from content creation and selecting sales formats to reaching potential customers. In this article, Optimal Agency will guide you step-by-step through selling online on Facebook simply and participating in selling on Marketplace for beginners.
Guide to creating a Fanpage for online businesses
To start selling online on Facebook methodically, the first thing we recommend you do is create a professional business Fanpage. A Fanpage is not only the “face” of the brand but also the platform for running ads, customer care, and building long-term credibility. Below is a detailed step-by-step guide suitable for beginners.
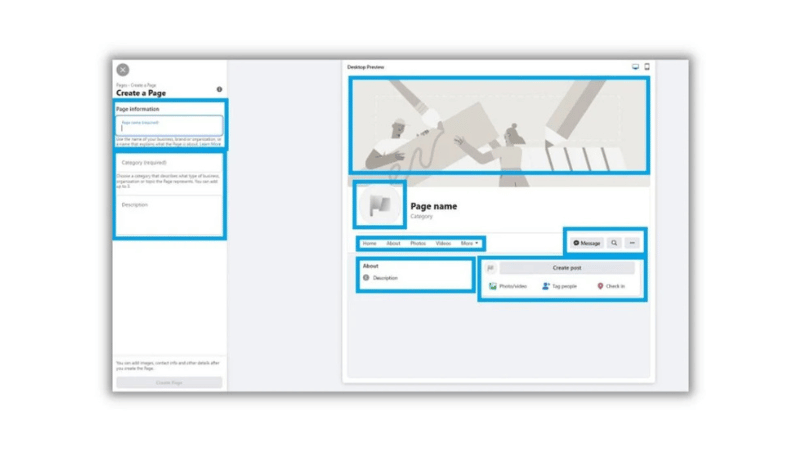
Access Facebook and create a new Page
First, log in to your personal Facebook account. On the main interface, click the menu in the top-right corner and select the Pages section. In the left column, Facebook will allow you to create a new Page.
Enter your business or brand name here. This name should be official, memorable, and consistent with other sales channels. For example, in this guide, we are creating a Facebook page for a hypothetical brand named “Coconut Skincare.” If the name you want is taken, you can add variations like “Official,” “VN,” or a category description to differentiate it.
Select categories and write a brand description
After naming the Page, the next step is selecting categories that describe the business. Facebook allows up to 3 categories, such as Cosmetics, Skincare, Cosmetic Store. Choosing the right categories helps Facebook understand what your Page is selling, thereby supporting better visibility to potential customers.
Next, scroll down to the Bio section and write a brief description of the brand. For example: “Natural skincare cosmetics made from organic coconuts through sustainable farming.” This part doesn’t need to be too elaborate, as you can edit it after the Page is active. Once done, click Create Page. Your basic Fanpage is now successfully created.
Add business information and operating hours
After creating the Page, we recommend completing the information immediately to increase trust. Add a website, phone number, business email, and operating address. For purely online stores, you can leave the detailed address blank; however, you should still specify the business region to reassure customers.
Next, add operating hours. If you sell online, you can choose “Always Open (24/7).” If it is a physical store, enter specific opening hours to avoid customer misunderstandings. Once complete, click Next. All this information can be edited at any time.
Set up profile and cover photos for the Page
In the next step, Facebook will display the “Page Health,” comparing it with similar Fanpages. Then, you need to upload a profile picture and a cover photo. The profile picture is usually the brand logo, while the cover photo can be product images, sales messages, or promotions. If you don’t have a design ready, we suggest using Canva, a free, easy-to-use tool with a large template library. You just need to drag and drop to have a professional-looking image, even without design experience.
Add action buttons and contact channels
After finishing the images, scroll down to Add action button and click “Try it.” Ask yourself: when guests visit the Fanpage, what do you want them to do?
For online stores, popular options are “Send Message,” “View Shop,” or “Start Order.” In practice, many advertisers choose the “Send Message” button because customers often need to ask questions before buying, especially for new or high-value products. You can also connect Messenger or WhatsApp for quick contact. When combining a Facebook Fanpage, Instagram Business, and WhatsApp, all messages will be gathered in Meta Business Suite, helping us and you manage inboxes, content, and ads on a single platform. If you don’t use WhatsApp yet, you can skip this step and continue.
Complete the setup and start operating the Fanpage.
In the final steps, Facebook will suggest inviting friends to follow the Page and choosing how to receive notifications. These steps can be done later, so just click Next and Done.
Congratulations, you have a complete Facebook Business Fanpage. From here, you can easily switch between your personal account and the Page in the top right corner. In the Edit Page section, you should add the “About” section, link social networks like Instagram, TikTok, YouTube, service information, price ranges, languages, and the founding date. These details make the Fanpage look more professional and increase discoverability on Facebook. Additionally, you can go to Settings to manage access, adding administrators or collaborators. For example, a community manager only needs to reply to messages and comments, while an administrator will have full control over the Page.
How to sell online on Facebook for beginners
To sell effectively on Facebook, especially when running ads, the importance lies not in “how much money you burn” but in setting up the right structure from the start. We see many new advertisers struggle because accounts are created impulsively without a clear strategy, leading to high costs without orders. Below is the structure we usually apply for beginners—simple but providing enough foundation to scale later. The first and most important thing we need to do correctly is build the ad account structure. For this model, we recommend creating 4 main campaigns, each serving a different role in the customer’s buying journey.
Prospecting CBO
This is the backbone campaign, used to reach completely new customers who have never known your product.
Setup:
- Click Create in Ads Manager.
- Select the Sales objective.
- Name the campaign: Prospecting CBO.
- Buying type: Auction.
- Objective: Sales.
- Do not set a campaign spending limit.
- Turn on Campaign Budget (Advantage+ Campaign Budget).
Budget:
- This campaign accounts for about 80% of the total budget.
- Example: if your total budget is $1,000, allocate about $800 to Prospecting.
Bidding Strategy:
- Select Highest volume or Highest value.
- No need to adjust advanced settings.
- Keep the default schedule. The goal of this campaign is to give Facebook enough data and optimization space, rather than constricting the system with too many limits.
Audience Segment Reporting
Before diving into ad sets, we recommend setting up Audience Segments, as this helps Facebook understand who is a new customer and who is a returning one. Setup:
- Go to Advertiser Settings.
- Select Audience Segments. Set up:
- Engaged audiences: people who visited the website or added to cart in the last 30–90 days.
- Existing customers: all customers who have previously purchased. If you use Shopify, Klaviyo, or a CRM, upload pixel data and customer lists. Once complete, these groups will appear in campaign settings and help with accurate segmenting.
Ad Set Setup
At the ad set level, we focus on conversion optimization, not random testing.
Recommended settings:
- Ad set name: Pack number one.
- Conversion location: Website and Shop.
- Performance goal: Maximize the number of conversions.
- Data set: select the active data set.
- Turn on Conversions API.
- Conversion event: Purchase (always Purchase).
- Attribution: 7-day click, 1-day view.
- Do not set a budget at the ad set level.
Audience targeting
For Prospecting, we recommend leaving the audience 100% broad to let Facebook optimize itself. Method:
- Select Further limit the reach of your ads.
- Switch to Use your own setup.
- Do not add interests.
- Add exclusions:
- Website visitors (90 days) and
- Purchasers (180 days).
The purpose is to create separate “swimming lanes” between Prospecting, Retargeting, and Existing customers, preventing campaigns from overlapping.
Ad placements
Let Facebook distribute automatically:
- Keep all placements.
- Only exclude if your creative is unsuitable (e.g., vertical video not optimized for Feed).
Ad Setup
At the ad level, everything needs to be clear and easy to track.
Setup:
- Name using the format image_ or video_.
- Select Create ad.
- Manual upload.
- Format: Single image or video.
- Turn off multi-advertiser ads.
- Do not set a schedule.
Creative and Image Formats
Each ad should have all 3 image or video formats:
- Square
- Vertical (1080×1920)
- Horizontal.
Specifically, turn off Flexible media to prevent Facebook from auto-cropping and ruining the layout.
Ad copy
For beginners, we usually suggest:
- Create 5 versions of the primary text.
- Use Facebook’s AI to generate more variations.
- Short Headlines (30–60 characters).
- CTA: Shop Now.
- Descriptions can be omitted if the primary text is strong enough.
You can use ChatGPT to assist with initial copy, then refine it for your brand voice.
Enhancements
Should turn on:
- Text improvements
- Enhanced CTA
- Show products
Should NOT turn on
- Translate text
- 3D animation
- Image animation
- Visual touch-up
Turning on too many effects often makes the ad look less natural.
URL and Tracking
Before turning on the ad, check:
- Correct destination URL.
- Website events turned on.
- Use UTM or automatic tracking to monitor effectiveness.
Other campaigns in the system
Retargeting
- Small budget.
- Track frequency (ideally 5–7).
- Audience:
- Add to cart and initiate checkout (90 days)
- Website visitors (30 days)
Catalog Retargeting:
- Use Advantage+ Catalog Ads
- Target people who viewed products or added to cart
- Exclude purchasers (14 days)
Existing Customers:
- Purchasers (180 days)
- Purchasers all-time
- Creative must be exclusive to existing customers; do not reuse Prospecting ads.
Scale Campaign
Use ad set budget.
Exclude retargeting and retention
Only move winning ads here to expand
Advanced Cost Cap for high-spending accounts
This strategy should only be applied when spending $1,000–$2,000/day or more. Example:
- AOV = $100
- Target ROAS = 2
- Cost cap = $50.
- Ad set budget around $500/day.
Facebook will only spend when it reaches the cost cap you set, helping with better profit control.
HOT 2026: Selling online on the Marketplace
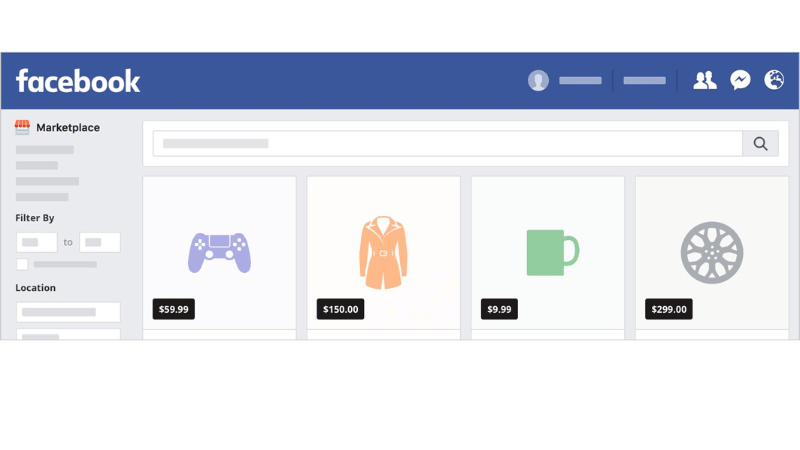
You just need to log in to your personal Facebook account. In the left menu of the homepage, find and click on Marketplace. Upon access, you will see a variety of products listed in your area, from phones, laptops, cameras, and drones to vehicles and household appliances. Marketplace allows us to set the location and search radius. This is particularly suitable for products like electronics, motorcycles, or bulky items. In the left column of Marketplace, you will see several important sections:
- Marketplace Inbox to reply to buyer messages.
- Buying to manage purchase orders.
- Selling to manage all products currently for sale.
When you click Selling, you will see a list of all your listings along with the Seller Dashboard. This is a crucial area as it displays views, messages, saves, and the performance of each product. For professional sellers, this is the control panel to optimize sales content.
How to create a product listing on Marketplace
To start selling, click the Create new listing button. Facebook will give you listing types such as:
- Item for sale
- Vehicle for sale
- Property for sale
For most online stores, we choose Item. For example, let’s try listing a pair of sneakers. The steps are simple:
- Add product images (should use clear, real photos).
- Choose primary and secondary photos.
- Select product condition (New or Used).
- Set a clear title (e.g., “Authentic Vans Flame”).
- Enter the price (e.g., $75).
- Select the appropriate category (e.g., Clothing, Men’s Shoes).
- Add size and color if applicable.
You can skip non-mandatory fields to save time.
Optimize description and transaction method
Next, add a detailed description of the product. We recommend clearly stating:
- Actual condition.
- Reason for selling.
- Whether it includes the box or accessories.
Additionally, you can add product tags like “sneaker,” “Vans,” or “men’s shoes” to increase visibility. Marketplace also allows adding an SKU, location, and selecting transaction methods like “In-person meetup,” “Door drop-off,” or “Door pickup.” A very useful feature is the Boost listing option to turn the listing into an ad if you want to accelerate sales. If you don’t want friends or relatives to see the listing, you can also hide it from your friends list.
Posting and post-sale management
After double-checking all information, click Next and Publish. Facebook will notify you when the listing is complete. From the Seller Dashboard, you can track performance, reply to messages, and manage all sales activities. When the product is sold, simply select Mark as sold to update the status. This makes your Marketplace profile look more professional while increasing trust with future buyers.
Starting to sell online on Facebook is not too complicated if you head in the right direction and take steady steps. From creating a Fanpage and posting products to utilizing the Marketplace and interacting with customers, these are all important foundations for building sustainable revenue. Start simple, continuously optimize content and customer experience, and you will gradually see clear results even as a beginner.
Frequently Asked Questions
Most people start their online business by selling through their personal Facebook page, but this makes it difficult to reach new customers. To reach new target customers, businesses have stepped up sales activities on Fanpages or Groups. However, selling online on a Fanpage is suitable for large-scale businesses because management and advertising costs are quite high. For individual small sellers with limited advertising budgets, sales groups are a suitable choice.
Although doing business online on Facebook brings many benefits, some issues still exist:
If selling on a personal page, it is difficult to reach customers. Selling on a Fanpage requires investment in advertising for reach and time to build credibility. Posting in Groups may not be approved and requires content writing skills.
With selling on Marketplace, the ability to reach customers is low because not many people use this feature yet. Selling via livestream requires building attractive scripts, good offers, and knowing how to manage orders.